محتوى
The easiest way to build a home water distillation system is the stovetop pot-and-bowl method — no special tools, no drilling, no hardware store trip required. You place a large stainless steel pot on your stove, float a glass bowl inside it, invert the lid, pack ice on top, and let boiling steam condense on the cold lid and drip into the bowl below. That's the complete working principle of a water distiller, achieved with items you likely already own. For anyone who wants more volume, more convenience, or a permanent setup, there are progressively more involved options — from a simple pot-with-tube rig to a pressure cooker distiller to a solar still in the backyard. This article covers all of them, with the materials, steps, costs, and limitations laid out clearly so you can choose the right build for your situation.
Before getting into the builds, it's worth understanding exactly what a water distiller removes and why that matters. Distillation works by boiling water into steam, which rises and separates from dissolved solids, then condensing that steam back into liquid in a clean container. Any contaminant that cannot vaporize at or below 212°F is left behind in the boiling chamber.
The list of things a home water distiller removes is long:
Tap water in the United States meets federal safety standards, but those standards permit trace levels of dozens of contaminants. The EPA's legal limit for lead in drinking water, for instance, is 15 parts per billion — a level that public health researchers argue is not actually safe for long-term consumption, especially in children. Events like the Flint, Michigan water crisis demonstrated that infrastructure failures can expose households to lead at concentrations far above that limit with little warning.
Beyond drinking, distilled water is required or strongly recommended for a range of household uses: CPAP humidifiers, lead-acid batteries, steam irons, aquariums sensitive to chlorine and nitrates, certain indoor plants like orchids, and any laboratory or medical application. Buying distilled water in gallon jugs costs roughly $1 to $1.50 per gallon at most grocery stores. A countertop electric water distiller produces distilled water for approximately $0.02 per 8-ounce glass based on average US electricity rates — making a DIY or purchased home distiller economically compelling within months of use.
Every water distiller — from a $10 DIY pot setup to a $400 electric countertop unit — operates on the same three-stage process:
The variable between different builds is how efficiently they manage these three stages. A pot-and-bowl setup on a kitchen stove achieves all three steps but slowly — typically producing around half a liter per hour. A pressure cooker distiller with a copper coil condenser can double or triple that rate. A dedicated electric water distiller typically processes a full gallon in about four hours automatically, with no monitoring required.
One important note: volatile organic compounds (VOCs) — chemicals like chloroform, benzene, and certain pesticides — have boiling points below or near water's boiling point and can travel with the steam. A serious distillation setup adds an activated carbon post-filter to catch these. For household use where the source is municipal tap water rather than heavily contaminated well water, this is less of a concern, but it's worth knowing.
This is the simplest possible home water distiller. It requires nothing you don't already have in a standard kitchen and can be assembled in under two minutes.
Use a glass or stainless steel bowl exclusively — never plastic. Even food-grade plastics can leach trace compounds into water under heat.
Yield: this method typically produces 300–500 mL of distilled water per hour, depending on heat level and how consistently the ice is replenished. It's practical for small, occasional needs — filling a CPAP reservoir, topping off a battery, or producing a few cups for a particular recipe — but not for daily high-volume household use.
This method routes steam out of the pot through a tube rather than collecting condensation from a lid. The tube runs through ice water or is coiled so it cools quickly, producing liquid distillate at a faster, more consistent rate. It requires a small amount of basic drilling and hardware store materials, but the build takes under 30 minutes.
This method produces roughly double the output of the pot-and-bowl approach, yielding around 600–800 mL per hour under good conditions. It's still a manual, attended process but significantly more efficient. Use silicone hose rated for food contact or high-temperature use — standard garden hose or vinyl tubing is not appropriate.
This is the preferred DIY water distiller for anyone who wants serious output from a homemade system. A six-quart stainless steel pressure cooker serves as a sealed boiling chamber, a coiled copper tube acts as the condenser, and a collection bucket captures clean output. Total build cost is approximately $55–$70, and the system can run for hours with minimal oversight.
Output: expect 1–1.5 liters per hour. Over a four-hour session, this rig can produce a meaningful supply of distilled water suitable for daily use in a small household. Copper is an excellent conductor of heat, which accelerates cooling and condensation in the coil. However, be aware that copper itself can contribute trace amounts of copper ions to distilled water — this is generally considered safe at typical home distillation rates, but if you're concerned, stainless steel coil tubing is available as an alternative at higher cost.
A solar still is the right answer for anyone with outdoor space, access to sunlight, and the willingness to do a weekend woodworking project. It requires no electricity, no gas, and produces distilled water continuously during daylight hours. The build uses plywood, glass, and a shallow basin — materials available at any hardware store for under $100 total.
The principle: a sealed, insulated box is painted black on the interior and filled with a shallow layer of source water. A tilted sheet of glass covers the box. Sunlight heats the interior, evaporating water. The vapor condenses on the cooler glass surface and runs down into a trough along the lower edge, where it drains into a collection container outside the box.
Output varies by sunlight intensity, ambient temperature, and box size, but a 24 by 36-inch solar still in a sunny climate typically produces around 1–2 liters per full sun day. This is lower than stovetop methods per hour but costs nothing to operate and requires no supervision. It's an excellent supplementary source of distilled water for garden or battery use. One practical limitation: solar stills are far less effective in winter, overcast climates, or for anyone living above 50 degrees latitude.
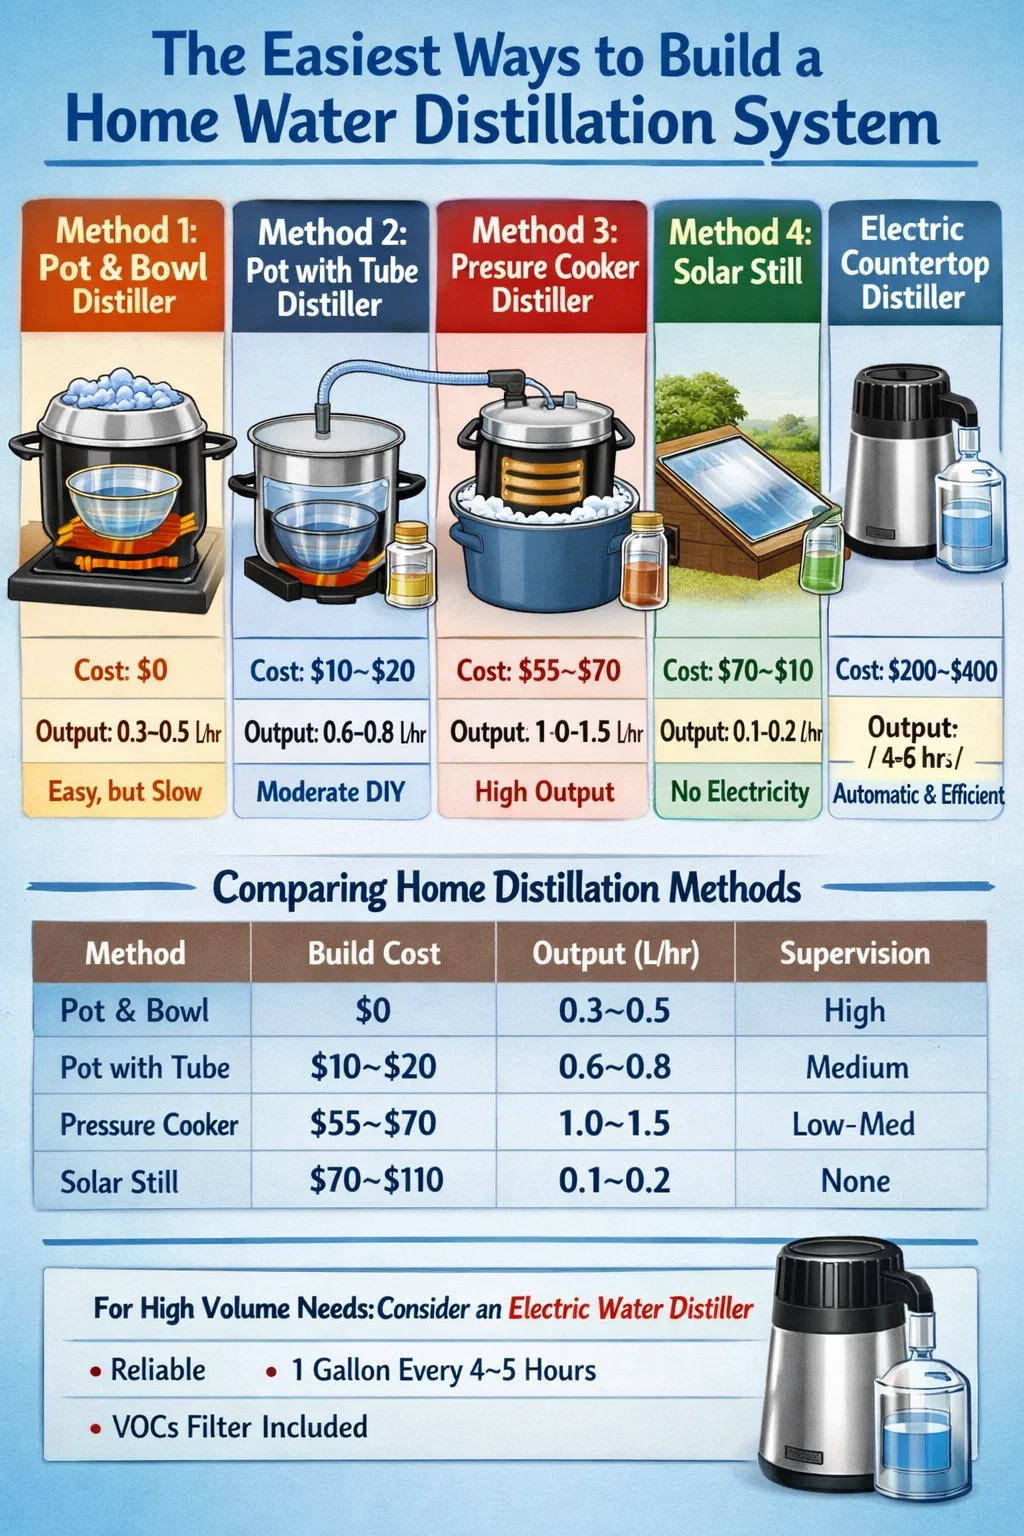
| Method | Build Cost | Output (L/hr) | Tools Needed | Supervision Required | Best For |
|---|---|---|---|---|---|
| Pot & Bowl (stovetop) | $0 | 0.3–0.5 | None | High | Occasional small batches |
| Pot with Tube | $10–$20 | 0.6–0.8 | Drill | Medium | Regular light use |
| Pressure Cooker Rig | $55–$70 | 1.0–1.5 | Drill, epoxy | Low-Medium | Daily household use |
| Solar Still | $70–$110 | 0.1–0.2 | Saw, screws, drill | None (passive) | Off-grid, supplementary |
DIY builds are satisfying and cost-effective, but a purchased countertop electric water distiller outperforms every homemade setup in terms of consistency, output, and convenience. If your household regularly consumes distilled water — for cooking, drinking, medical devices, or appliances — the economics favor a dedicated machine.
Entry-level countertop water distillers typically produce around 1 gallon every 4–5 hours, require no monitoring, and include a carbon post-filter to catch VOCs. The machines are designed to run repeatedly without degradation. Many have been in service for more than 20 years. Operating cost is roughly $0.25–$0.35 per gallon at average US electricity rates, compared to $1.00–$1.50 per gallon for store-bought distilled water — a savings of up to 75% on an ongoing basis.
For high-volume needs — whole households, small businesses, off-grid properties — automatic water distillers exist that connect directly to a water line and produce several gallons per day on demand, feeding a storage tank and dispensing through a faucet. These are more expensive upfront (typically $400–$800) but eliminate the manual process entirely.
The decision rule is straightforward: if you need distilled water fewer than a few times per week for small quantities, a DIY setup is completely adequate. If you need a reliable gallon or more per day, a countertop electric water distiller is the better investment.
The purity of your distilled water depends not just on the distillation process but on the materials that steam and condensate contact throughout the system. Several common household materials are inappropriate for use in a water distiller:
Any home water distiller — DIY or purchased — requires periodic cleaning to maintain output quality and efficiency. Mineral scale (primarily calcium carbonate) accumulates in the boiling chamber over time, reducing heat transfer efficiency and producing a chalky residue. This is a normal byproduct of the distillation process, not a flaw in the build.
Fill the boiling chamber with a solution of white vinegar and water (roughly 1 part vinegar to 3 parts water) and heat it to a simmer for 20–30 minutes. This dissolves calcium carbonate scale effectively. For heavier buildup, a commercial descaling solution works faster. After descaling, run a plain water cycle and discard the output before returning to normal use.
For copper coil condensers, periodic flushing with a dilute citric acid solution (1 tablespoon per liter of water) helps dissolve mineral film. Silicone tubing can be boiled in clean water or cleaned with dilute vinegar. Replace tubing if it shows any discoloration, cracking, or permanent deformation — silicone tubing is inexpensive and should be treated as a consumable.
Frequency depends entirely on source water hardness. In areas with very hard water (above 200 mg/L total dissolved solids), a visible white residue will appear in the boiling chamber after just a few sessions. In softer water areas, the same buildup may take weeks. Inspect the chamber after every 10–15 uses and clean when scale is visible.
A water distiller is one of several options for improving water quality at home. Understanding where it sits relative to alternatives helps clarify when it's the right choice and when something else might serve you better.
| Method | Removes Heavy Metals | Removes Bacteria/Viruses | Removes Fluoride | Removes VOCs | Output Safe to Drink |
|---|---|---|---|---|---|
| Distillation | Yes | Yes | Yes | Partial (needs carbon filter) | Yes |
| Reverse Osmosis | Yes | Mostly | Mostly | Partial | Yes |
| Carbon Filter (pitcher) | Partial | No | No | Yes | Yes |
| Water Softener | No | No | No | No | Yes (reduces hardness only) |
| UV Sterilization | No | Yes | No | No | Yes |
| Boiling Only | No | Yes | No | No | Yes (microbes only) |
Distillation produces the highest purity water of any home method. Reverse osmosis is its closest competitor for drinking water and is generally cheaper to install and run for that specific purpose. The key advantage of a home water distiller is that it can handle severely contaminated or unknown-quality source water — including well water, lake water, or water from locations without reliable treatment infrastructure — in ways that a carbon filter or even reverse osmosis cannot fully address.
Yes, distilled water is safe for regular consumption. The concern that it "leaches minerals from your body" or is somehow harmful is a persistent myth without scientific backing. The minerals in drinking water contribute a very small fraction of overall daily mineral intake — the vast majority comes from food. People in many parts of the world drink naturally low-mineral water without adverse effects. If you have concerns about mineral intake specifically, maintain a nutritionally complete diet; do not rely on tap water as a primary mineral source.
In a sealed glass container, distilled water can remain pure for up to two years. In plastic containers, trace chemical migration from the plastic begins within days to weeks depending on the plastic type and storage conditions. For drinking use, glass or stainless steel storage is strongly recommended and batch sizes should match your near-term consumption.
A pressure cooker-style DIY rig running for four hours per day can produce 4–6 liters, which is sufficient for cooking and drinking for one to two people. For a family of four relying on distilled water as a primary drinking source, a countertop electric water distiller producing one gallon per four-hour cycle — and capable of running multiple cycles per day — is a more practical solution than manual stovetop methods.
Yes. Chlorine has a boiling point of -34°C and chloramines volatilize readily during heating, meaning they typically escape before or during the early stage of distillation rather than traveling with the steam into the condenser. Most distilled water from a home water distiller will contain little to no detectable chlorine.
 英语
英语 阿拉伯语
阿拉伯语